Download options
Open Export in the studio. The recommended Complete project download contains everything below; the other files are listed under Individual files, and Project settings sits beneath them. Everything except project settings needs freshly generated real terrain with no export-blocking messages.
ZIP and file names start with your project name, lower-cased with spaces replaced by hyphens. The examples below use my-map. The combined download is limited to 100 MB; if a project exceeds it, reduce the map details or the size of the map area.
Water finishes and their files
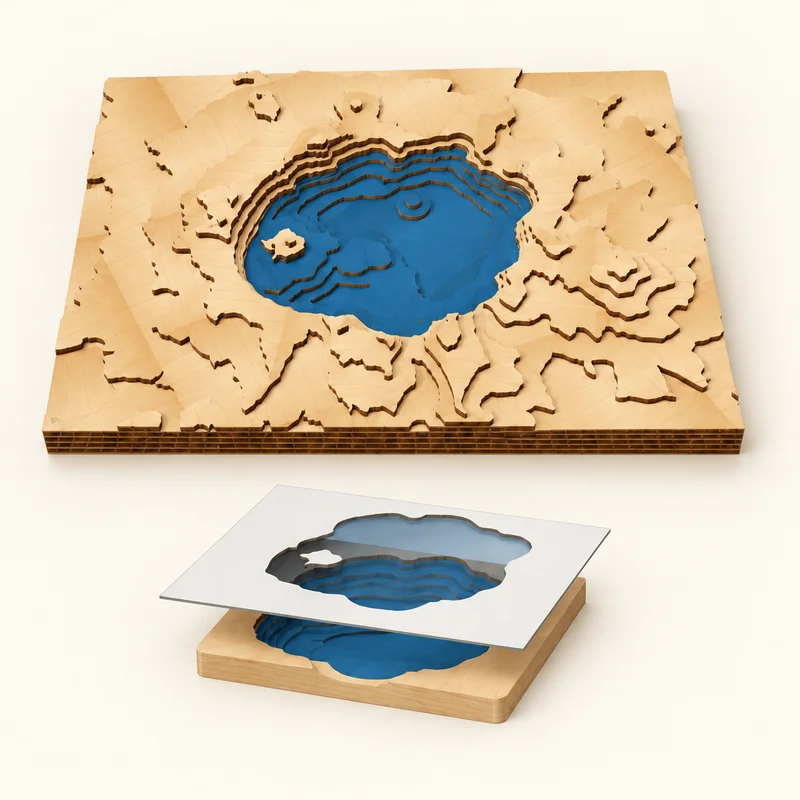
Painted wood
Keep the lake in wood and paint or stain the exposed steps. Turn on Water paint templates to export a stencil for each panel with visible water, then paint before gluing.
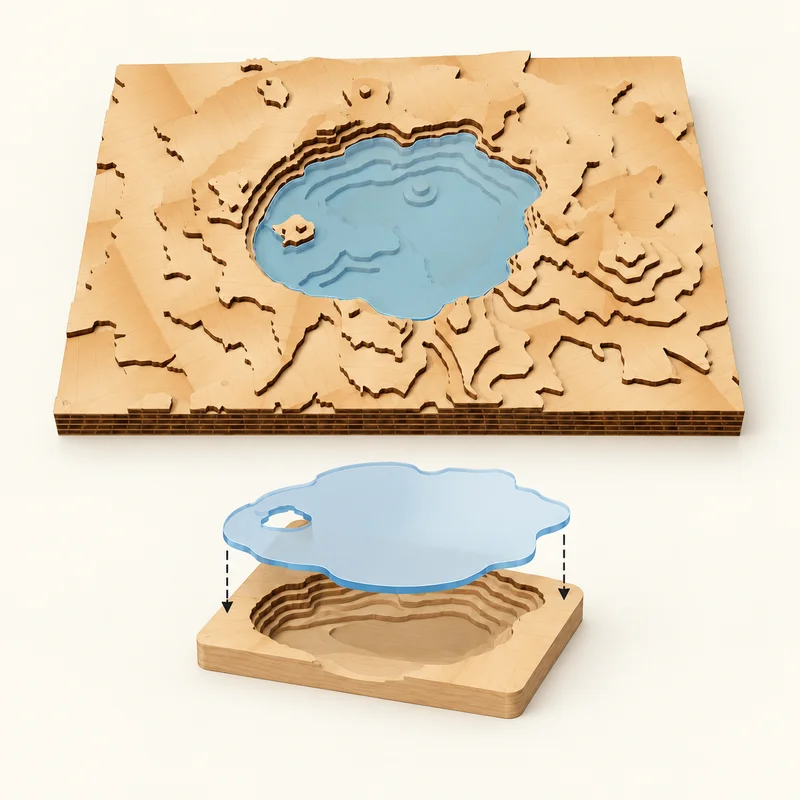
Acrylic inserts
Turn on Acrylic water inserts to cut a fitted piece for each lake at its waterline. Cut the acrylic as a separate job, then fit it onto the support ledge using the assembly guide.
You can combine both finishes: paint the lake bed before fitting clear acrylic over it. Illustrations show the finishes and assembly; your exported shapes follow your project.
For painted wood, download Paint templates and cut the paper stencils with kerf compensation off. For acrylic, download Acrylic inserts and use the separate acrylic thickness, kerf and fit clearance from the Water panel. Complete project includes both sets when enabled. See the water paint template guide for painting the bed before assembly.
Layered relief files
| File | Contents |
|---|---|
my-map-master.svg | Every fabrication panel laid out in a grid of up to four columns, 12 mm apart, with shared CUT, SCORE and ENGRAVE groups. |
my-map-layer-03.svg | A panel holding one layer, with its cut, score and engrave paths. |
my-map-panel-02-layers-02-05.svg | A panel holding more than one layer because of material-saving nests: here, layer 05 is cut from inside layer 02's sheet. |
my-map-layer-03-b2.svg | With a work area set, one panel per tile of a split layer: column B, row 2. A piece that needs its own sheet adds a number, as in -b2-2. |
…-engrave.svg | The engraving-only companion of the panel with the same name, in the same position. It has no cut or score paths. |
…-paint-water.svg | A paper stencil registered to the panel with the same name. It is the cut piece at nominal size (cut it with kerf compensation off) with the water that stays visible once the stack is glued cut away, reaching 1.5 mm under the layer above so a slightly misplaced stencil leaves no bare edge. Where water meets the piece edge the stencil stops short of it, so register on the edges and tabs it keeps. Lay it flush to the piece, spray, and remove it before gluing. Only written when Water paint templates is on and the panel has visible water. |
my-map-airspace-blue-02.svg | With Airspace in 3D on: the airspace pieces of level 02 (lowest first) in one acrylic colour, clear, blue or magenta, cut at their true size with the acrylic kerf. Frosted shelves, sector edges and the outlines where rods meet each piece are engraved on top. A piece too large to share a panel gets its own, as in -airspace-blue-02-a2-1.svg. Each has an -engrave.svg companion, my-map-airspace-blue-master.svg holds each colour, and my-map-airspace-backing.svg is the plain sheet glued under the model when some rods stand through the bottom layer. The assembly guide lists every rod length and where it goes. |
my-map-acrylic-04.svg | With Acrylic water inserts on: the acrylic inserts that fill the lake openings in layer 04, cut and engraved as their own job with your acrylic settings. Each insert is smaller than its opening by the fit clearance and compensated for the acrylic kerf. An insert too large to share a panel with the others gets its own, as in -acrylic-04-w2.svg; nested acrylic is written as my-map-acrylic-sheet-01.svg. Each has an -engrave.svg companion, and my-map-acrylic-master.svg holds them all. Inserts carry no engraved ids: the assembly guide names them W1, W2 and so on. |
my-map-assembly-guide.html | A step-by-step assembly booklet that opens in any browser and prints on US Letter: finished size and materials, a checklist of sheets to cut, what the engraved marks mean, and one illustrated step per layer from layer 01 upward, showing the stack so far with the new layer highlighted, which sheet its pieces come from, and where split pieces go. |
README.txt | Layer count, finished stack height, applied vertical exaggeration and horizontal scale, any lake depth fitting, line widths, panel count, colors, kerf and nesting notes. |
my-map-project.json | Your settings plus generation details (see below). |
ATTRIBUTION.txt | Credits for the data used (see below). |
Use one engraving copy per panel. Either process the complete panel SVG, or cut from the panel SVG and engrave from its -engrave.svg companion with the panel's engraving disabled. Processing both engraves the same paths twice.
Airspace files
With Airspace in 3D on, Airspace downloads the acrylic bundle; Complete project includes terrain and airspace. Files group pieces by altitude level and acrylic tint. A backing sheet is included when rod sockets need it. The assembly guide includes the rod cut list, level maps, piece IDs and through-rod placement heights.
Inspect Airspace acrylic in Cut layers before exporting. Engraved sector names and original altitude references are included where they fit; navigation notices and the source cycle record what the model represents. Read cut and assemble acrylic airspace for material settings and the build order.
Acrylic tint names describe material choices. The red, blue and black SVG paths still describe processing operations. Do not apply wood processing settings to the acrylic job, and process the panel engraving or its companion only once.
Flat engraving files
| File | Contents |
|---|---|
my-map-engraving.svg | The artwork at physical size, containing engraving paths only. |
README.txt | Artwork size, contour count, index interval, water fill, line widths, map details and border. |
my-map-project.json | Your settings plus generation details. |
ATTRIBUTION.txt | Credits for the data used. |
Colors and operation groups
Every SVG sets its width and height in millimeters, so it should import at the finished size. Paths are grouped by the operation TopoStack intends:
| Group | Stroke | Used for |
|---|---|---|
CUT | Red #FE0002 | Layer outlines and holes (layered only). |
SCORE | Blue #2366FF | Water shorelines and rivers (layered only). |
ENGRAVE | Blue #2366FF | Roads, trails, labels, boundaries, the coordinate grid, north arrow, markers, alignment marks, and in flat output the contours and border. |
Choose Score for blue linework in both SCORE and ENGRAVE groups, Cut for red outlines, and Engrave only for intentionally filled blue artwork. Group names organize the SVG; verify the processing type in Studio. Inside ENGRAVE, detail groups are named by feature so you can give them separate line weights or turn them off:
- Layered: each panel has a
fabrication-panel-N-ENGRAVEgroup listing its layers in adata-layersattribute. Inside it, each layer has groups such aslayer-03-ENGRAVE-trails,-major-roads,-local-roads,-transport-labels,-water,-boundaries,-coordinate-grid,-annotationsand-general. - Flat:
ENGRAVE-contours-minor,ENGRAVE-contours-index,ENGRAVE-water-fill,ENGRAVE-map-details(with the same feature subgroups) andENGRAVE-border.
Marker clearances are gaps in the exported line geometry, not white fabrication objects. Solid marker symbols retain their blue fill with no duplicate outline stroke; use Engrave for those filled shapes.
Kerf, panel size and alignment marks
In layered output, Laser kerf in the Fabricate panel is the full width your beam removes. Outer cuts move outward and holes move inward by half that width, so the finished pieces match the artwork. Each panel's canvas is enlarged by the kerf to make room. Set Laser kerf to 0 if your laser software applies its own compensation.
When Assembly guides is on, each lower layer has an engraved outline of the layer above it, inset by half the line width plus the kerf, labeled with that layer’s number (for example L04 on layer 03). They are hidden once the next layer is glued in place.
When Work area width or Work area height splits a layer, each piece also engraves its id, such as L03-B2 (layer 03, column B, row 2), in a separate green (#00A651) ASSEMBLY group where the next layer will cover it. Assign that color to Score or turn off Assembly labels, under Panels and seams in the export dialog, if you don't want it. Seam edges get the same kerf compensation as every other cut, so pieces butt together at their intended size.
Project file
my-map-project.json holds your full settings, so you can import it in the studio to continue. It also records the generation date, elevation range, map bounds, terrain resolution and sources, data versions, warnings, and for layered output each layer's elevation and file, panel and nesting details, and each lake's depth source and applied depth scaling. Imported projects need fresh terrain generation before export.
The Project settings download contains the settings only, and imports the same way.
Credits
ATTRIBUTION.txt lists the credits and licenses of the terrain, map, lake outline and survey sources used, and the terrain imagery sources reported by the provider. Keep it with the artwork when you share or sell a piece. Sources and attribution describes every source TopoStack can use.
Every SVG also carries a short “Made with TopoStack” credit in its <desc> description, and README.txt ends with the same line. The description is file metadata: it is not a path, so it never draws, cuts or engraves.
Next steps
Using LightBurn? Follow the LightBurn import and processing guide to check dimensions, assign operations and apply kerf once.
Follow the layered map guide or the engraving guide, or see troubleshooting if export is blocked.